Wednesday 20 March 2013

how to maintain chart of account and deletion process


How to maintain charts of accounts:
We are maintaining the chart of account because we are building our new company. For new company we have to maintain the chart of account.
Chart of account is the account which is used to maintain the various transactions.
To maintain the chart of account first we open the Peachtree, and then open our existing company and click on the maintain chart of account.

By clicking on “Maintain chart of account” we get the following screen.

To maintain the chart of account we have three requirements to fill.
·        Account Type
·        Description
·        Account type


To start this process , first we enter the Account I D , then enter the Description of the transaction , than tells them about the Account Type .after completing these requirements , to save these information we press the button “Alt+s” and the procedure carry on so.
How we can delete the chart of account if it is wrongly recorded.
To delete the chart of account we press on the “Look up button” and than we got the following screen.

By clicking on the “look up button” we got the saved chart of account and than we can select the desired chart of account which we want to change, which may be wrongly, recorded. After selecting the desired chart of account we got the following screen.


To delete this desired chart of account we click on the button “Delete”
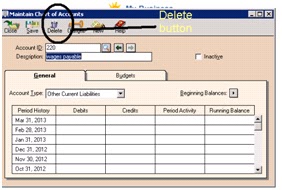
and by clicking on delete we got the confirmation question of delete .

And by clicking on “yes ‘ we can complete the process of deletion.

Wednesday 13 March 2013

“Setup a new company”


“Setup a new company”
To setup a new company first we click on the start menu and follow the following procedure.


Than we open the Peachtree complete accounting 2004 and we got the following   picture.

And than we click on the “setup a new company “and follow the following procedure.


This is company new setup information which is required by the software. By clicking on the “Next” we got the following information.


To form a new company setup this software requires these information specially the company name which is filled by above procedure and by clicking on “Next” button we got the following information.


This file ask us about the several methods of setting up the company .first one option is about the new retail, manufacturing, construction .second option to use extensive chart of account , third option to copy setup from the existing company of Peachtree , Fourth one to convert a company from another accounting period and the Fifth one is for the building a new corporation. But we are setting our company that’s why we are choosing the option of “building your own company” and by clicking on next we got the following file.


Accrual is a system in which income is recorded when the invoice is received but expense is recorded when cash is paid. Cash is a system in which is recorded when cash is received and expense is recorded when paid .Most of the companies use the Accrual accounting system. This file give us the option of choosing accounting system and from these two option we are choosing the “Accrual” and than click on next.


.


This file give us the option of posting method we have chosen the method of “Real Time” Because most of the companies use this method. Batch time is avoided because to use this method it requires a lot of time that’s why we are choosing this Real time option. And by clicking on Next we got the following information.


This file gives us the option of choosing the accounting period whether it is 12 months or a period which do not match the calendar month. We will click on the 12 months and than go for the Next.


This file requires the information that what kind of accounting period you want and what month will be chooses for the company. And by clicking on the Next button we got the following screen.


Now we have completed the task of setup a new company. And by clicking on Finish button we got the following screen which shows the new company which is setup by us.
  

Wednesday 6 March 2013

Opening Microsoft Word Documents


Opening Microsoft Word Documents
We'll shortly add an address to the top of our Library Complaint letter. Before we do that, we'll learn how to open a file. After all, you might have closed down Microsoft Word, or your computer might have crashed. The result being that you no longer have your library letter loaded into Word. So here's how to Open a file you have saved, and want to work on again.
From the File menu, click Open:

The Open dialogue box appears, and looks like the image below:

The Open dialogue box looks very similar to the Save As dialogue box. "Save in", "File name", and "Files of type" work in exactly the same way as the Save As dialogue box. Notice, though that the File name text box is blank, and the Open button is not available. It has been greyed out.
The reason that the Open button is greyed out, and therefore not available, is that text box is empty. Once you select a file, the Open button will be ready for us.
But the text box is empty because no file has been selected. A file is selected from the larger white area in the middle. Clicking on the file once with the left hand mouse button will select a file. In the previous image, there was only one file available for selection - a document called "rrKeyCaps.doc". That is not the one we want.
To locate the file we want, we need to open the folder called "My WP Projects". Because that's where we saved it. You can see from the image that this folder is in the list of folders, just below the folder called My Pictures:

You can see also that we are in the folder called My Documents. To open up the folder we want, simply double click it. This will take us inside the My WP Projects:


The whole Open dialogue box now looks like this:

The file we want, Library Letter, has been clicked on. As a result, the Open button is no longer greyed out. We can go ahead and click it. When we do, our letter will open in Microsoft Word.
To recap then on how to open a file. Do the following
· Navigate to the folder where the file was saved
· Click on the file to select it
· Click the Open button
OK, now that you know how to Open a file, we can start adding the address to our letter